

Most creators struggle with a disjointed design process that forces them to jump between different software programs. You might spend an hour creating a beautiful background in one tool only to find that you cannot easily add your product or character to it without opening a second, complicated application. This friction kills creativity and wastes valuable time that you could spend on more important tasks. By learning how to merge these two technologies into a single workflow, you can create professional visuals in a fraction of the time.
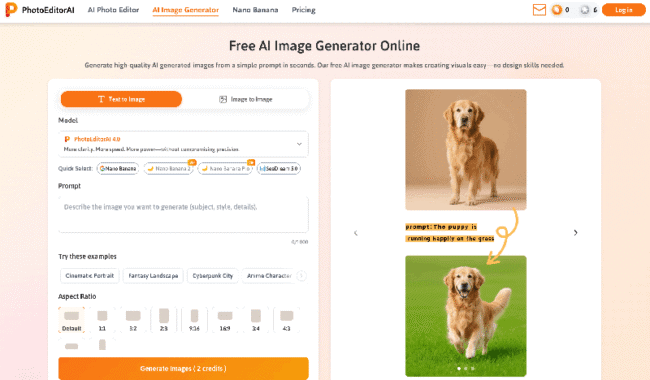
The first step in a modern design process involves creating a high quality base. If you do not have a specific photo to work with, you can use a free ai image generator to build a custom scene from scratch. This allows you to define the lighting, the mood, and the overall composition before you even think about the finer details. You simply type in what you want to see and let the software handle the heavy lifting of digital painting or 3D rendering.
Once you have your base image, you will likely notice small areas that need improvement or specific elements that do not look quite right. This is where you bring in an ai photo editor to refine the output and make it look realistic. Instead of starting over when a hand looks strange or a shadow falls the wrong way, you can use editing tools to fix those specific spots. This combination of creation and correction is the secret to producing high-end digital content quickly.
Combining these tools requires a bit of planning to ensure the final result looks cohesive. You should think of the generation phase as the foundation of a house and the editing phase as the interior design and finishing touches. If the foundation is weak, no amount of editing will save the image. However, even a perfect foundation needs a skilled hand to turn it into a home. This tutorial will walk you through the exact steps to master this unified workflow.
Step 1: Define Your Visual Concept
Before you touch any software, you need a clear plan for your image. You should decide on the subject matter, the colour palette, and the intended use of the final file. If you are creating a social media post, you might want bright colours and a central focus. If you are designing a website hero image, you might need more negative space for text.
Writing down a few keywords can help you stay on track. Think about the time of day, the type of camera lens you want to simulate, and the piece’s overall emotional feel. This preparation helps you avoid getting lost in the endless possibilities AI tools offer. It also makes your prompting much more effective in the next stage.
Step 2: Generate the Primary Asset
Now you can move into the generation phase to create your background or main subject. Use descriptive language in your prompts to get as close as possible to your vision. Instead of typing a cat in a forest, try a fluffy ginger cat sitting on a mossy log in a sunlit pine forest at golden hour. The more detail you provide, the less editing you will have to do later.
Do not feel discouraged if the first few results are not perfect. You can iterate on your prompt by adding or removing words to see how the AI reacts. Look for a version that has the right composition and lighting, even if some of the details are slightly off. You can always fix those small errors in the next step of the workflow.
Step 3: Clean Up and Enhance
After you have a base image that you like, it is time to switch to editing mode. Most generated images have small artifacts or unwanted objects that distract the viewer. You might find a random floating shape in the background or a smudge on the main subject. Using an object removal tool is the fastest way to clean these up without leaving a trace.
You should also look at the overall clarity of the image. Sometimes AI generation can result in soft edges or a lack of texture in certain areas. You can use enhancement tools to sharpen the focus on the most important parts of the image. This ensures that the viewer’s eye is drawn exactly where you want it to go.
Step 4: Integrate External Elements
The real power of this workflow comes from combining your generated base with other photos. For example, you might have a high-quality photo of a product that you want to place into a generated environment. You will need to remove the background from your product photo first. Then you can place it in the generated scene and adjust its position until it looks natural.
During this stage, pay close attention to the scale of the objects. A common mistake is making the added element too large or too small for the environment. Look at the surrounding objects in the generated image to determine the correct size. This step bridges the gap between pure AI creation and traditional digital compositing.
Step 5: Match Lighting and Colour
To make your composite look like a single photograph, you must match the lighting and colours of all elements. If your generated background has a warm, orange glow from a sunset, your added product should also have warm highlights. You can use colour grading tools to shift the tones of individual layers until they blend together perfectly.
Adjusting the shadows is also critical for realism. If your product is sitting on a table in the generated image, it needs to cast a shadow that matches the direction and softness of other shadows in the scene. This final layer of polish is what separates an amateur edit from a professional piece of digital art.
Tips and Best Practices
To get the most out of this workflow, you should follow a few simple rules that will save you time and improve your results. Consistency is the most important factor when working with multiple AI tools.
| Workflow Stage | Key Focus | Recommended Action |
| Planning | Composition | Sketch or list key elements |
| Generation | Lighting | Use specific time of day in prompts |
| Editing | Detail | Zoom in to 100 percent to check for errors |
| Compositing | Scale | Compare added items to background objects |
| Finalizing | Unity | Apply a final colour filter to the whole image |
You should always work with the highest resolution possible. If your generator produces a small image, use an upscaler before you start the detailed editing process. This gives you more pixels to work with and prevents the final result from looking blurry or pixelated.
Another great tip is to keep your prompts consistent across different generations. If you need to create a series of images, use the same style keywords in every prompt. This ensures that all your visuals look like they belong to the same brand or project. It also makes the editing process faster because you can apply the same colour corrections to every image in the set.
Common Mistakes to Avoid
Many people make the mistake of over-editing their images. It is easy to get carried away with all the available tools and end up with a photo that looks fake or plastic. You should aim for a natural look by keeping some of the original textures and imperfections. If you smooth out every surface, the image will lose its character and depth.
Another frequent error is ignoring the light source. If the sun is coming from the left in your generated background, but the shadows on your added object suggest the light is coming from the right, the brain will immediately recognize that something is wrong. Always identify the primary light source in your base image before you start adding new elements.
Finally, do not rely on the AI to do everything for you. While these tools are incredibly powerful, they still require human guidance. You need to be the director of the process. If a generated image is not working, do not be afraid to scrap it and start over with a better prompt. Your creative vision is the most important part of the entire workflow.
Summary
Combining AI image generation and photo editing into one workflow is the most efficient way to create modern digital content. You start by building a strong foundation with a generator and then use editing tools to refine and polish the details. This approach gives you the best of both worlds: the infinite creativity of AI and the precision of traditional editing.
By following the steps in this tutorial, you can stop struggling with multiple tools and start creating professional visuals with ease. Remember to plan your concept, generate high-quality bases, and spend time matching the lighting and scale of your elements. With a little practice, this workflow will become second nature, allowing you to produce stunning images faster than ever before.
submitted post


You must be logged in to post a comment.