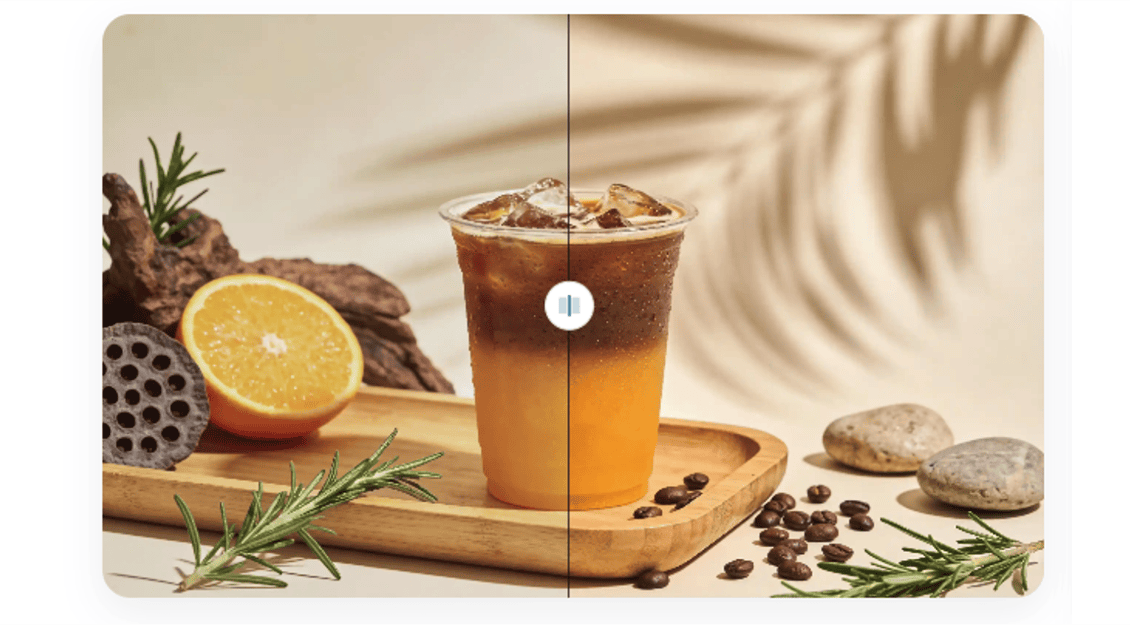
Blurry photos are a common problem for everyone who uses a camera. You might take a quick snapshot of a beautiful sunset only to find the details look soft and fuzzy later. This happens because of shaky hands, poor lighting, or a camera that failed to focus correctly. You do not have to settle for low-quality images that look unprofessional or messy.
It is now easier than ever to Sharpen Image Online without spending hours on a computer. You can fix your favourite memories or professional shots with just a few clicks. Most people think they need expensive software or years of training to fix a blurry photo, but that is no longer true.
Modern technology has changed how we handle digital photography. Using a dedicated ai image editor allows you to restore lost details and make your pictures look crisp. These tools analyze the pixels in your photo and determine where the edges should be. This process brings back the clarity you thought was gone forever.
Real World Scenarios for Sharpening Images
There are many times when a sharp image makes the difference between success and failure. Here are three common situations where sharpening your photos is essential.
Scenario 1: Improving Product Photos for E-commerce
If you sell items online, your photos are your most important sales tool. Customers cannot touch or feel the products you offer, so they rely entirely on what they see. A blurry photo of a piece of jewelry or a handmade craft looks lazy and untrustworthy. It suggests that the seller does not care about quality.
When you use a sharpening tool, you highlight the textures and fine details of your products. You might have a photo of a leather bag where the stitching looks a bit soft. By sharpening the image, you make those stitches pop, which shows the craftsmanship. This helps build trust with your buyers and can lead to more sales. Clear images help customers feel confident that they know exactly what they are buying.
Scenario 2: Restoring Old Family Photographs
Many families have boxes of old printed photos that they want to save for future generations. When you scan these old prints, they often come out looking a bit grainy or soft. Time can cause the original paper to fade, and older cameras did not always capture sharp details. These memories are priceless, and you want them to look as good as possible.
An AI tool can look at these scanned files and identify the faces and shapes within them. It works to reduce the digital noise and define the edges of the people in the photo. You can take a blurry picture of your grandparents from forty years ago and make it look like it was taken yesterday. This process helps preserve your family history in a way that looks beautiful on a digital screen or in a new print.
Scenario 3: Enhancing Social Media and Professional Profiles
Your online presence is often the first impression you make on others. This applies to your Instagram feed, your LinkedIn profile, or your personal blog. A blurry headshot looks unprofessional and can hurt your chances of landing a job or gaining followers. People respond better to high-quality visuals that look sharp and intentional.
Sometimes you have a great photo of yourself, but the focus is slightly off. Maybe the camera focused on the background instead of your face. You can use an online editor to fix this mistake. By sharpening the area around your eyes and hair, you draw attention back to the subject. This makes your profile look polished and helps you stand out in a crowded digital space.
Benefits of Using AI for Each Scenario
Each of the scenarios mentioned above benefits from AI technology in specific ways. Traditional sharpening often creates weird artifacts or makes the photo look like plastic. AI is different because it understands what it is looking at.
Benefits for E-commerce
The main benefit here is the increase in conversion rates. Sharp images lead to fewer questions from customers and fewer returns. When the image is clear, the customer has a better understanding of the product. You also save a lot of money because you do not have to hire a professional photographer for every single item. You can take a decent photo with your phone and use AI to make it look like it was shot in a studio.
Benefits for Family Memories
The biggest benefit of old photos is the emotional impact. Seeing a clear version of a loved one who has passed away is a powerful experience. AI tools can often guess where details should be based on millions of other images they have studied. This means they can fix blur that traditional tools simply cannot touch. It gives a second life to photos that were previously considered ruined.
Benefits of Social Media
For content creators, the benefit is engagement. Social media algorithms often favor high-quality content. A sharp, clear image is more likely to be shared and liked than a blurry one. It also saves you time. Instead of retaking a photo ten times to get the focus right, you can take one good shot and sharpen it later. This keeps your workflow fast and efficient.
Practical Workflow for Sharpening Your Images
You do not need to be a tech expert to get great results. Following a simple workflow will help you get the best out of your photos every time.
First, you need to choose the right file. Always start with the highest resolution version of the photo you have. If you use a small, low-quality thumbnail, the sharpening tool will have less data to work with. A larger file gives the AI more information to analyze, which results in a much cleaner final product.
Second, upload your photo to the online tool. Most modern editors have a simple drag-and-drop interface. Once the image is uploaded, you will usually see a slider or a set of options. Do not feel like you have to turn the sharpening all the way up to the maximum level. Sometimes a subtle touch is better than an aggressive one. You want the photo to look natural, not over-processed.
Third, use the preview feature to compare the before-and-after versions. Look closely at the edges of objects and the textures of skin or fabric. If you see strange glowing lines around the edges, you might have sharpened it too much. Adjust the settings until the image looks crisp but still looks like a real photograph.
Finally, download your sharpened image. It is a good idea to save it as a new file so you still have your original version. This allows you to go back and try different settings if you change your mind later.
Comparison of Sharpening Methods
It helps to see how different methods compare to each other. This table shows why AI is often the best choice for most people.
| Feature | Manual Editing | Basic Filters | AI Sharpening |
| Skill Level | Very High | Low | Low |
| Time Required | 20 to 30 Minutes | 1 Minute | Seconds |
| Detail Recovery | Good | Poor | Excellent |
| Risk of Artifacts | High | High | Low |
| Cost | Expensive Software | Free | Affordable or Free |
Manual editing requires you to understand things like unsharp masking and high-pass filters. These are complicated techniques that take a long time to master. Basic filters often just increase the contrast between pixels, which can make the photo look grainy. AI sharpening is the middle ground that offers professional results without the steep learning curve.
Common Mistakes to Avoid
Even with great tools, you can still make mistakes that hurt the quality of your images. One of the biggest mistakes is over-sharpening. When you push the settings too far, you create halos around the edges of your subjects. This looks fake and distracts the viewer from the photo’s actual content.
Another mistake is trying to fix a photo that is completely out of focus. While AI is powerful, it cannot perform miracles. If the photo is a total blur where you cannot even tell what the subject is, sharpening will not help much. It is best to use these tools on photos that are slightly soft or just need a bit more punch.
Finally, avoid sharpening images that already have a lot of digital noise. If you took a photo in a very dark room, it might be full of colorful dots called noise. Sharpening this noise will only make it more visible. You should use a noise-reduction tool first, then apply sharpening to the clean image.
Final Take
Improving the visual quality of your photos is a simple way to make your work and memories look better. Whether you are running a business, saving family history, or building a social media brand, clear images are vital. You have the power to fix blurry shots and bring out hidden details with ease.
By using an online tool, you save time and avoid the frustration of learning complex software. The technology does the heavy lifting for you, allowing you to focus on sharing your stories with the world. Start looking through your old or blurry photos today and see how much of a difference a little sharpening can make. You will be surprised at how much detail is hiding just beneath the surface of a soft image.
Other articles from totimes.ca – otttimes.ca – mtltimes.ca